# SST
영국 스코틀랜드에 위치하고 있고 가스 및 액체를 위한 다양한 센서와 시스템을 설계, 제조 및 맞춤제작을 형성하고 있습니다.
SST는 5년 이상의 수명, 디지털 센서, REACH, RoHS를 공통적으로 갖추고 준수하고 있습니다. SST는 각 단계에 대해 새로운 하드웨어 모듈을 생성할 필요 없이 Arduino, PCB, Sensor만 갖추고 있으시다면 신속한 Gas 측정이 가능합니다.
| LOX-O2 | LOX-O2-S | LOX-O2-F |
| -------------------------------------------------------------------------------------------------------------------------------------------------------------------------------------------------------------- | --------------------------------------------------------------------------------------------------------------------------------------------------------------------------------------------------------- | --------------------------------------------------------------------------------------------------------------------------------------------------------------------------------------------------------- |
|  |  |  |
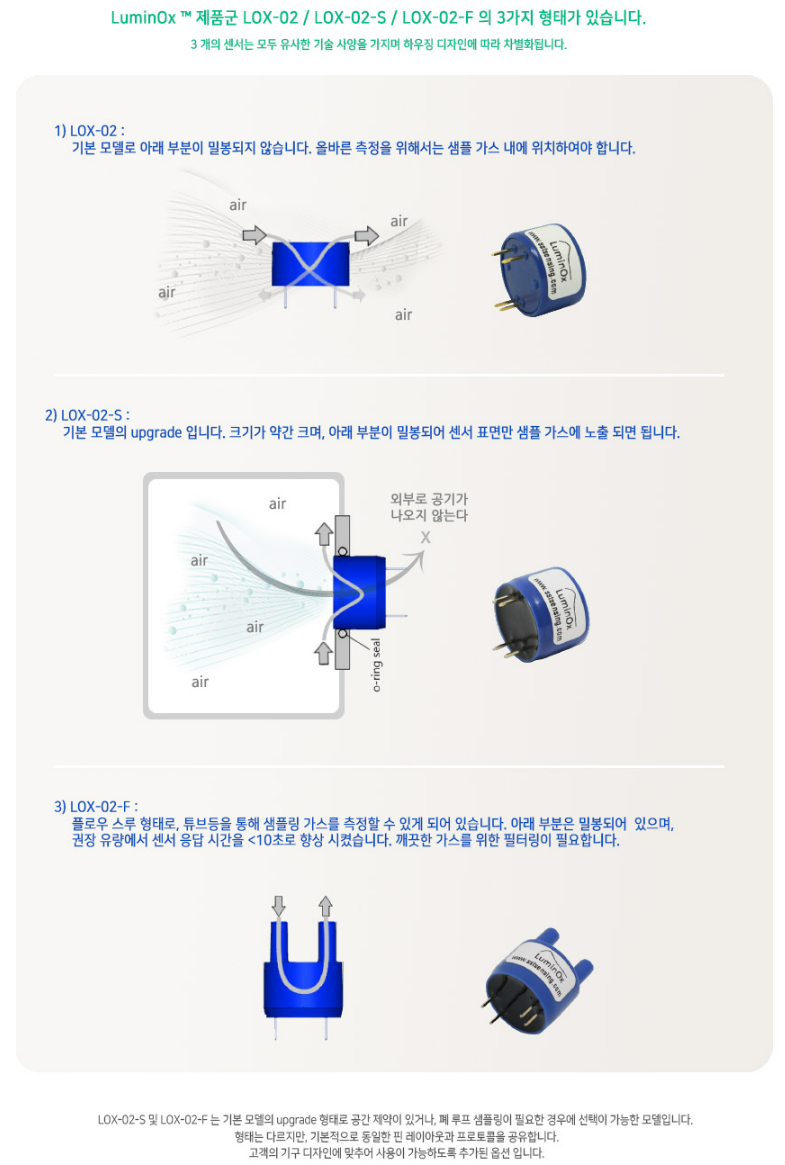 ## 1.특징
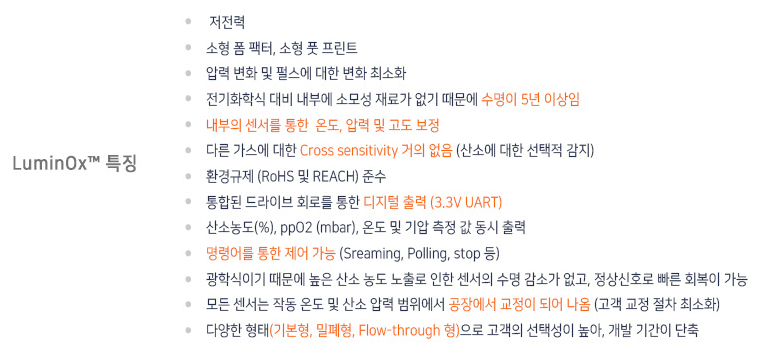
* 내장형 압력 센서, 디지털 출력이 있는 형광 기반의 소형 산소 센서
* 광범위한 환경 범위에서도 산소만 정확한 측정 및 작동
* 크기가 작아 공간이 제한된 애플리케이션에서도 이상적
* RoHS 및 REACH 준수
* 저전력 긴 수명
## 1.특징
* 내장형 압력 센서, 디지털 출력이 있는 형광 기반의 소형 산소 센서
* 광범위한 환경 범위에서도 산소만 정확한 측정 및 작동
* 크기가 작아 공간이 제한된 애플리케이션에서도 이상적
* RoHS 및 REACH 준수
* 저전력 긴 수명
 ## 2.애플리케이션
* 교통
* 텔레콤
* 산업
* 비행
* 선박
* 의료
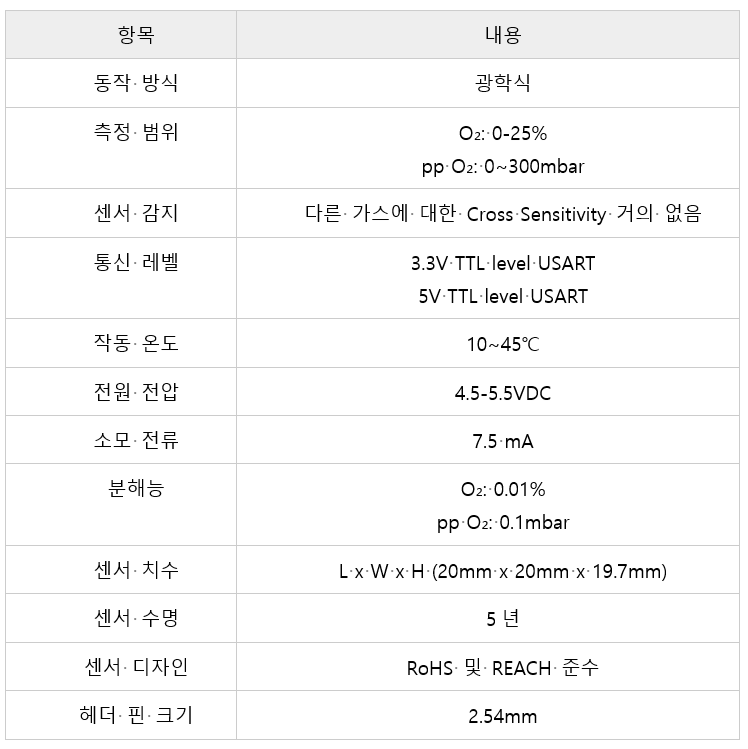
## 3.사양
## 2.애플리케이션
* 교통
* 텔레콤
* 산업
* 비행
* 선박
* 의료
## 3.사양
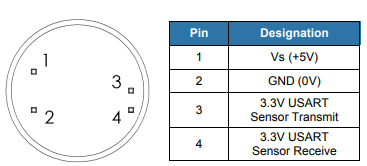
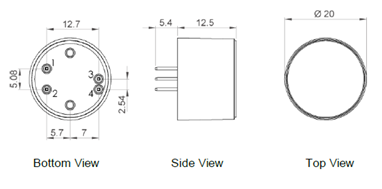
 ## 4.제품 크기 및 핀 특성
 #### [Datasheet](https://sstsensing.com/wp-content/uploads/2018/01/DS0144rev2_LOX-02-S.pdf)
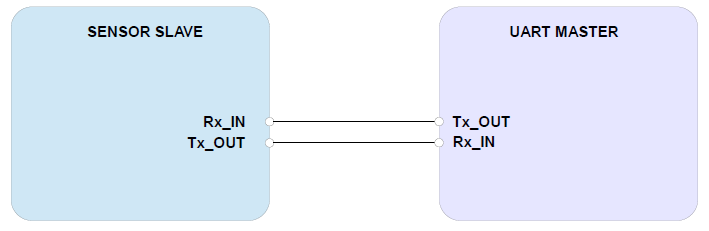
## 5. 디바이스 연결 방법
* Connection DIAGRAM (UART)
#### [Datasheet](https://sstsensing.com/wp-content/uploads/2018/01/DS0144rev2_LOX-02-S.pdf)
## 5. 디바이스 연결 방법
* Connection DIAGRAM (UART)
 {% tabs %}
{% tab title="Arduino Uno" %}
{% tabs %}
{% tab title="Arduino Uno" %}
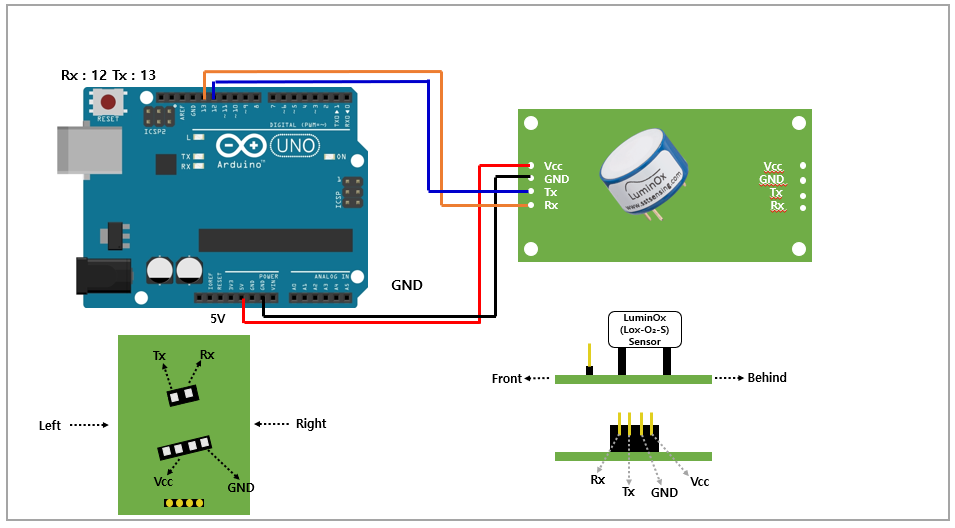 | 항목 | Arduino Uno | Lox-O2 |
| ------------ | ----------- | ------ |
| VCC | 5V | VCC |
| GND | GND | GND |
| TX | 12 | RX |
| RX | 13 | TX |
| {% endtab %} | | |
{% tab title="Arduino MKR" %}
| 항목 | Arduino Uno | Lox-O2 |
| ------------ | ----------- | ------ |
| VCC | 5V | VCC |
| GND | GND | GND |
| TX | 12 | RX |
| RX | 13 | TX |
| {% endtab %} | | |
{% tab title="Arduino MKR" %}
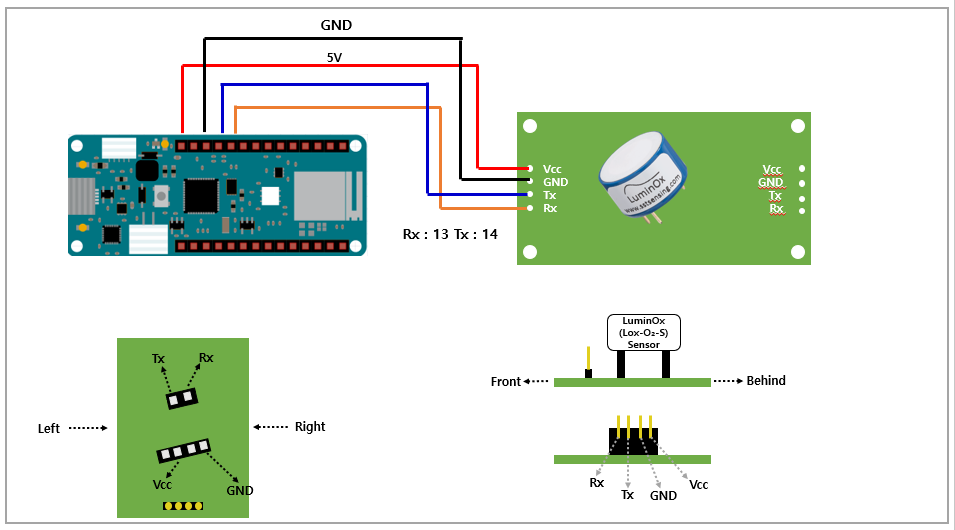 | 항목 | Arduino MKR | Lox-O2 |
| ------------ | ----------- | ------ |
| VCC | 5V | VCC |
| GND | GND | GND |
| TX | 14 | RX |
| RX | 13 | TX |
| {% endtab %} | | |
{% tab title="ESP32" %}
| 항목 | Arduino MKR | Lox-O2 |
| ------------ | ----------- | ------ |
| VCC | 5V | VCC |
| GND | GND | GND |
| TX | 14 | RX |
| RX | 13 | TX |
| {% endtab %} | | |
{% tab title="ESP32" %}
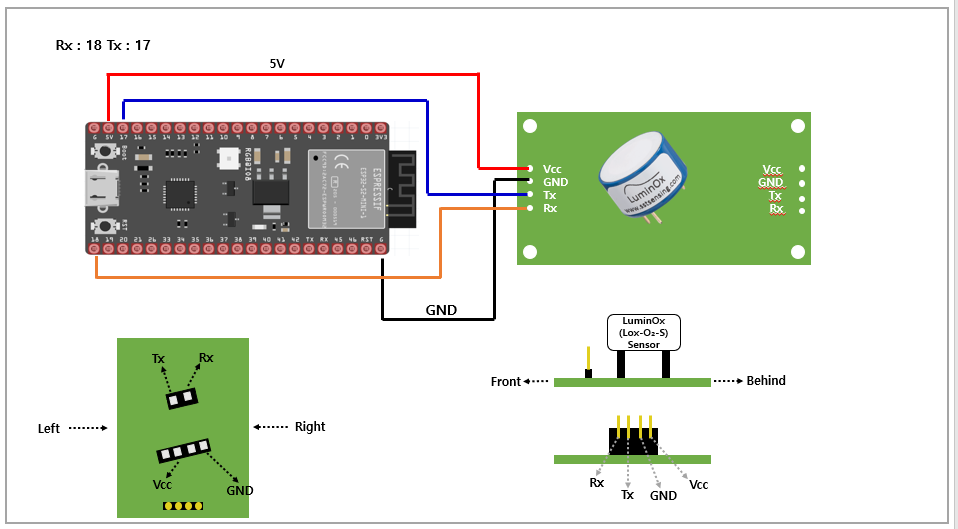 | 항목 | ESP32 | Lox-O2 |
| ------------ | ----- | ------ |
| VCC | 5V | VCC |
| GND | GND | GND |
| TX | 17 | RX |
| RX | 18 | TX |
| {% endtab %} | | |
{% tab title="ESP8266" %}
| 항목 | ESP32 | Lox-O2 |
| ------------ | ----- | ------ |
| VCC | 5V | VCC |
| GND | GND | GND |
| TX | 17 | RX |
| RX | 18 | TX |
| {% endtab %} | | |
{% tab title="ESP8266" %}
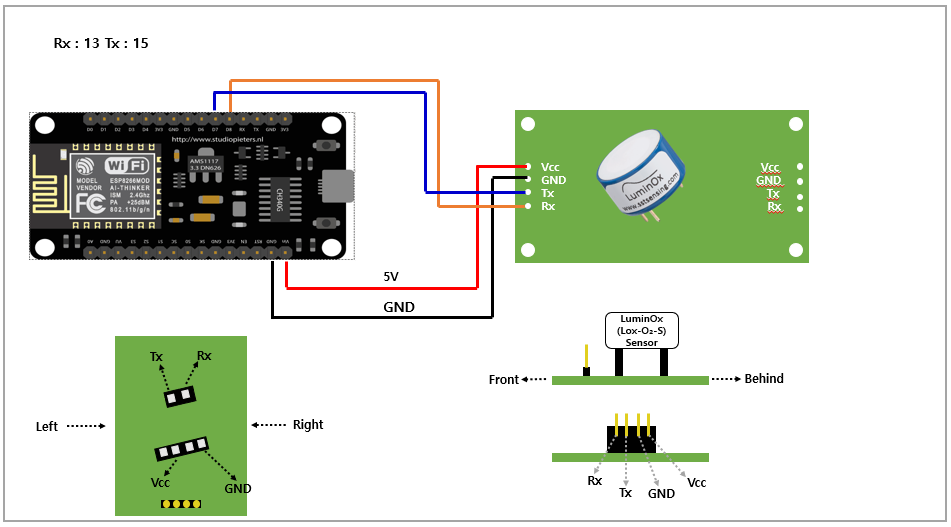 | 항목 | ESP8266 | Lox-O2 |
| ------------- | ------- | ------ |
| VCC | 5V | VCC |
| GND | GND | GND |
| TX | 13 | RX |
| RX | 15 | TX |
| {% endtab %} | | |
| {% endtabs %} | | |
## 6.통신 프로토콜 및 예제 코드
* UART 설정
| PARAMETER | TYP |
| ----------------- | -------- |
| Baud Rate (Fixed) | 9600 bps |
| Data Bits | 8 |
| Parity | None |
| Stop Bits | 1 |
| Flow Control | None |
* UART Command
| 항목 | ESP8266 | Lox-O2 |
| ------------- | ------- | ------ |
| VCC | 5V | VCC |
| GND | GND | GND |
| TX | 13 | RX |
| RX | 15 | TX |
| {% endtab %} | | |
| {% endtabs %} | | |
## 6.통신 프로토콜 및 예제 코드
* UART 설정
| PARAMETER | TYP |
| ----------------- | -------- |
| Baud Rate (Fixed) | 9600 bps |
| Data Bits | 8 |
| Parity | None |
| Stop Bits | 1 |
| Flow Control | None |
* UART Command
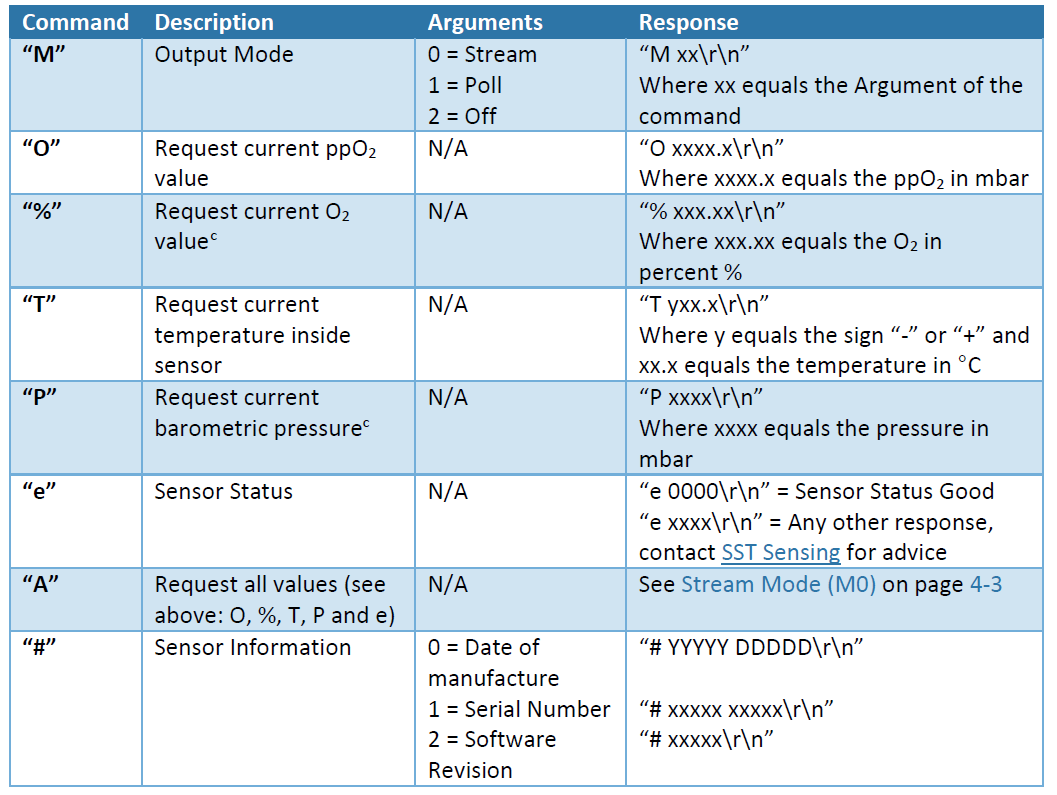
 * 모드 설정 및 O₂ 값 읽기
| Mode | Command | Description | Response |
|---|
| Stream | M 0 | 약 1초에 한 번씩 데이터 값을 전송 | K 00000 |
| Poll | M 1 | 센서 값 요청시에만 데이터 값 전송 | K 00001 |
| Off | M 2 | Sleep mode, 측정 X | K 00002 |
{% tabs %}
{% tab title="Stream Mode(default)에서 O₂ 값 읽기" %}
```cpp
#include
SoftwareSerial mySerial(12, 13); //Uno Rx Tx (12 13) = SoftwareSerial
const char* Stream_mode = "M 00\r\n";
String str;
void setup() {
Serial.begin(9600); //시리얼 통신 초기화
Serial.println("SST GAS Sensor");
mySerial.begin(9600);
mySerial.print(Stream_mode);
}
void loop()
{
/* Response
ex) O XXX T XXX P XXX % XXX e xxx
O XXX: PPO2
T XXX: temperature
P XXX: barometric pressurec
% XXX: O2
e XXX: Sensor Status
*/
if(mySerial.available()>0)
{
str = "";
str = mySerial.readStringUntil('\n');
Serial.println(str);
}
}
```
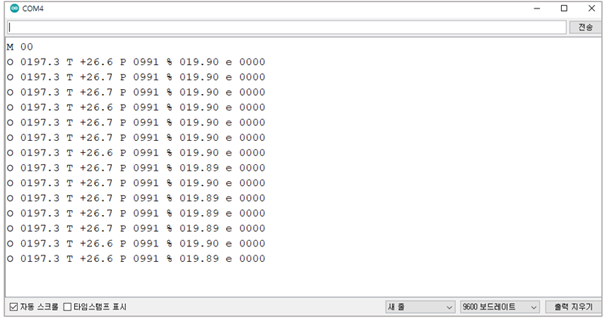 Stream Mode(default)에서 O₂ 값 읽기 부연 설명
\* O = 현재 산소분압(PPO₂)값 (mbar)
\* T = 현재 온도값 °C
\* P = 현재 기압값 (mbar)
\* % = 현재 O₂ 퍼센트 값 (%)
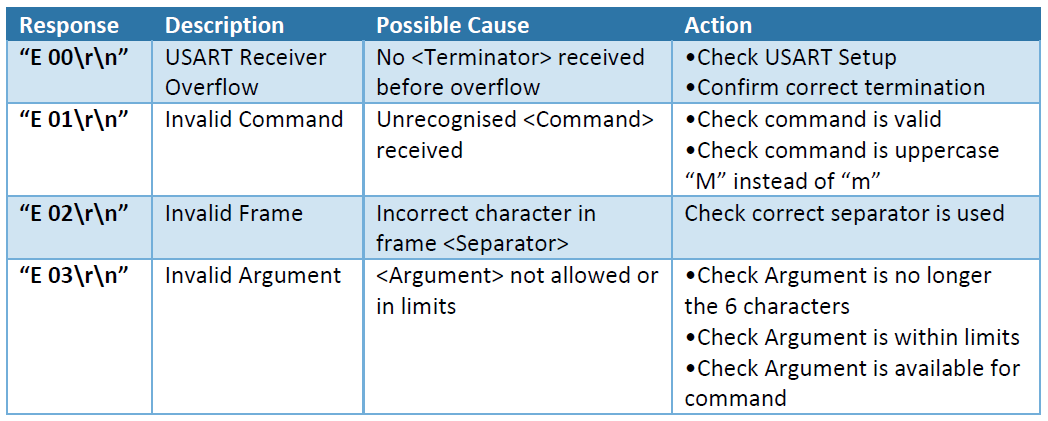
\* e = 센서 상태(“e 0000” = 센서상태 좋음, “e xxxx” = [SST sensing](https://sstsensing.com/)에 문의)
{% endtab %}
{% tab title="Poll Mode에서 O₂ 값 읽기" %}
```cpp
#include
SoftwareSerial mySerial(12, 13); //Uno Rx Tx (12 13) = SoftwareSerial
const char* Poll_mode = "M 01\r\n";
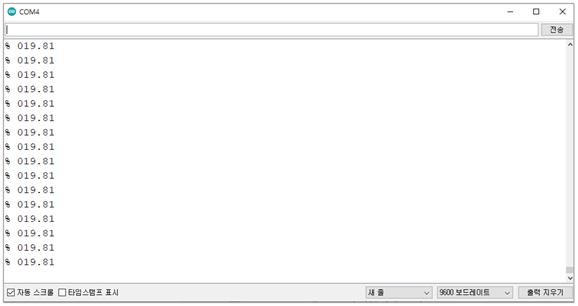
const char* O2_Read = "%\r\n";
String str;
void setup() {
Serial.begin(9600); //시리얼 통신 초기화
mySerial.begin(9600);
Serial.println("SST GAS Sensor");
delay(1000);
mySerial.print(Poll_mode);
}
void loop()
{
/* Response
ex) O XXX T XXX P XXX % XXX e xxx
O XXX: PPO2
T XXX: temperature
P XXX: barometric pressurec
% XXX: O2
e XXX: Sensor Status
*/
mySerial.print(O2_Read);
delay(1000);
if(mySerial.available()>0)
{
str = "";
str = mySerial.readStringUntil('\n');
Serial.println(str);
}
}
```
Stream Mode(default)에서 O₂ 값 읽기 부연 설명
\* O = 현재 산소분압(PPO₂)값 (mbar)
\* T = 현재 온도값 °C
\* P = 현재 기압값 (mbar)
\* % = 현재 O₂ 퍼센트 값 (%)
\* e = 센서 상태(“e 0000” = 센서상태 좋음, “e xxxx” = [SST sensing](https://sstsensing.com/)에 문의)
{% endtab %}
{% tab title="Poll Mode에서 O₂ 값 읽기" %}
```cpp
#include
SoftwareSerial mySerial(12, 13); //Uno Rx Tx (12 13) = SoftwareSerial
const char* Poll_mode = "M 01\r\n";
const char* O2_Read = "%\r\n";
String str;
void setup() {
Serial.begin(9600); //시리얼 통신 초기화
mySerial.begin(9600);
Serial.println("SST GAS Sensor");
delay(1000);
mySerial.print(Poll_mode);
}
void loop()
{
/* Response
ex) O XXX T XXX P XXX % XXX e xxx
O XXX: PPO2
T XXX: temperature
P XXX: barometric pressurec
% XXX: O2
e XXX: Sensor Status
*/
mySerial.print(O2_Read);
delay(1000);
if(mySerial.available()>0)
{
str = "";
str = mySerial.readStringUntil('\n');
Serial.println(str);
}
}
```
 {% endtab %}
{% endtabs %}
## 7.Thingspeak 활용 방법
{% embed url="" %}
Step1. 아두이노 IDE에 Thingspeak 라이브러리 추가

Step2. Wi-Fi ssid, pass 확인 및 변경
* code Thingspeak ssid, password 부분 자신이 사용할 Wi-Fi ssid, pass로 변경
Step3. Thingpeak channelnumber 및 api key 확인
* Thingspeak -> channel -> my channel -> channel setting -> channel id 확인 후 code 변경
* Thingspeak -> channel -> my channel -> Api keys -> Write Api key -> key 확인 후 code 변경
## 소스 코드
{% tabs %}
{% tab title="Thingspeak" %}
```cpp
#include
#include "ThingSpeak.h"
#include
#include
const char* Poll_mode = "M 01\r\n";
const char* O2_Read = "%\r\n";
const char* ssid = "your network SSID"; // your network SSID (name)
const char* password = "your network password"; // your network password
WiFiClient client;
unsigned long myChannelNumber = your channel number;
const char * myWriteAPIKey = "your channel api key";
// Timer variables
String str;
unsigned long lastTime = 0;
unsigned long timerDelay = 10000;
void setup()
{
Serial.begin(9600);
WiFi.mode(WIFI_STA);
ThingSpeak.begin(client); // Initialize ThingSpeak
}
void loop()
{
float o2_value_to;
Serial1.print(O2_Read);
delay(1000);
if(Serial1.available()>0)
{
str = "";
str = Serial1.readStringUntil('\n');
Serial.println(str);
int o2_length = str.length();
String value_o2 = str.substring(o2_length-6, o2_length);
o2_value_to = value_o2 .tofloat();
}
if ((millis() - lastTime) > timerDelay)
{
// Connect or reconnect to WiFi
if(WiFi.status() != WL_CONNECTED)
{
Serial.print("Attempting to connect");
while(WiFi.status() != WL_CONNECTED){
WiFi.begin(ssid, password);
delay(2000);
}
Serial.println("\nConnected.");
}
// pieces of information in a channel. Here, we write to field 1.
ThingSpeak.setField(1, o2_value_to);
int x = ThingSpeak.writeFields(myChannelNumber, myWriteAPIKey);
if(x == 200){
Serial.println("Channel update successful.");
}
else{
Serial.println("Problem updating channel. HTTP error code " + String(x));
}
lastTime = millis();
}
```
{% endtab %}
{% endtabs %}
{% endtab %}
{% endtabs %}
## 7.Thingspeak 활용 방법
{% embed url="" %}
Step1. 아두이노 IDE에 Thingspeak 라이브러리 추가

Step2. Wi-Fi ssid, pass 확인 및 변경
* code Thingspeak ssid, password 부분 자신이 사용할 Wi-Fi ssid, pass로 변경
Step3. Thingpeak channelnumber 및 api key 확인
* Thingspeak -> channel -> my channel -> channel setting -> channel id 확인 후 code 변경
* Thingspeak -> channel -> my channel -> Api keys -> Write Api key -> key 확인 후 code 변경
## 소스 코드
{% tabs %}
{% tab title="Thingspeak" %}
```cpp
#include
#include "ThingSpeak.h"
#include
#include
const char* Poll_mode = "M 01\r\n";
const char* O2_Read = "%\r\n";
const char* ssid = "your network SSID"; // your network SSID (name)
const char* password = "your network password"; // your network password
WiFiClient client;
unsigned long myChannelNumber = your channel number;
const char * myWriteAPIKey = "your channel api key";
// Timer variables
String str;
unsigned long lastTime = 0;
unsigned long timerDelay = 10000;
void setup()
{
Serial.begin(9600);
WiFi.mode(WIFI_STA);
ThingSpeak.begin(client); // Initialize ThingSpeak
}
void loop()
{
float o2_value_to;
Serial1.print(O2_Read);
delay(1000);
if(Serial1.available()>0)
{
str = "";
str = Serial1.readStringUntil('\n');
Serial.println(str);
int o2_length = str.length();
String value_o2 = str.substring(o2_length-6, o2_length);
o2_value_to = value_o2 .tofloat();
}
if ((millis() - lastTime) > timerDelay)
{
// Connect or reconnect to WiFi
if(WiFi.status() != WL_CONNECTED)
{
Serial.print("Attempting to connect");
while(WiFi.status() != WL_CONNECTED){
WiFi.begin(ssid, password);
delay(2000);
}
Serial.println("\nConnected.");
}
// pieces of information in a channel. Here, we write to field 1.
ThingSpeak.setField(1, o2_value_to);
int x = ThingSpeak.writeFields(myChannelNumber, myWriteAPIKey);
if(x == 200){
Serial.println("Channel update successful.");
}
else{
Serial.println("Problem updating channel. HTTP error code " + String(x));
}
lastTime = millis();
}
```
{% endtab %}
{% endtabs %}